![How to Use Google Keyword Planner [Latest Guide] 2019 By Experts.](https://www.marketing2business.com/wp-content/uploads/2019/08/How-to-Use-Google-Keyword-Planner-Latest-Guide-2019-By-Experts..jpg "How to Use Google Keyword Planner [Latest Guide] 2019 By Experts.")
What is the Google Keyword Planner?
- The Google Keyword Planner is a useful and free tool that you can use for various purposes:
- To plan your Google keyword planner (and find out the cost estimates, find keywords related to the terms you propose, etc.)
- Or for your organic traffic strategies. Remember that the SEO of your website depends mostly on the content you generate and publish. If you have a blog and want to position yourself in Google organically, what you write about your texts will be fundamental. But how to know what to write about? With Google Keyword Planner, it’s easier than you think.
The tool is indeed updated from time to time, so users usually win, but sometimes we lose some functionality.
So you know how to use it for free and get the most out of it, I have decided to make this post, which I hope will be useful.
Find keywords with the Google Keyword Planner Tool.
Step 1: Enter Google Keyword Planner or Register an account.
- Open the browser and visit https://adwords.google.com.
- If you have an account, enter your information, otherwise, click on “Register now.”

Step 2: Go to “Tools and Analysis” in Google Keyword Planner.
-
- Click on “Tools and analysis” in the top menu.

- Click on “Tools and analysis” in the top menu.
-
- And then in “Keyword Planner” in the submenu that will be displayed.
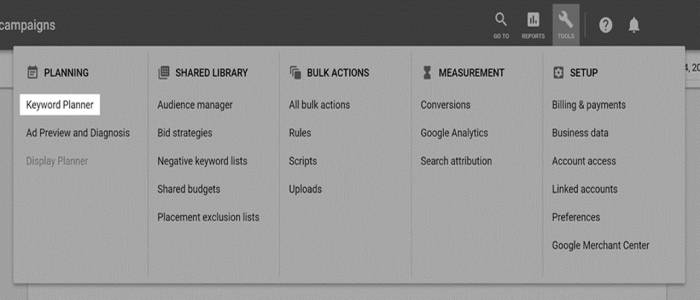
- And then in “Keyword Planner” in the submenu that will be displayed.
Step 3: Choose the type of search that suits you best.
-
- Most of the time, you will use the first or second option:
- Find new ideas for keywords and ad groups in Google Keyword Planner Tool.
- Get the search volume from a list of keywords or include them in ad groups.
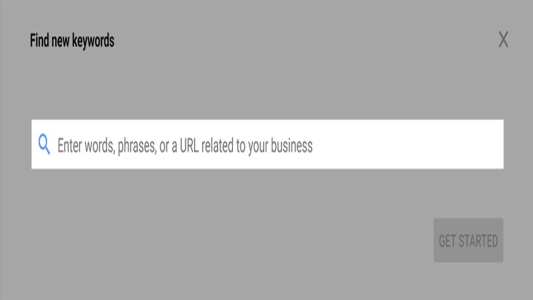
Step 4: Search for New Keyword Ideas.
-
- This is the selection you will use most often, to evaluate keyword ideas and start researching others.
By choosing this option, a form will be displayed that you must fill out according to your needs.
- This is the selection you will use most often, to evaluate keyword ideas and start researching others.
Step 5: Your Product or Service.
- Here you must enter one or several words/phrases for which you want to find out their search volume … or explore possible variants in Google Keyword Planner Tool.
-
- For example: “coffee”, etc.

- When you have used this tool a lot, or if you already had enough experience with the Google Keyword Planner Tool, you will realize that there are many keywords that never appear in the suggestions.
- For example: “coffee”, etc.
Fortunately, with a little practice and some other trick, you can get this tool to show you “better” keywords.
Step 6: landing page.
This option will be beneficial to analyze the pages of your competitors!
When entering a competitor’s address, you will see the keywords for which you are trying to position yourself
What is interesting?
Here Are Approximately things you should know about this option:
- You will not always be interested in analyzing the primary domain of a competitor.
- Sometimes you will get more elaborate and easy to position keyword on inside pages.
- Search and analyze the page that competes most directly with your keywords.
You can use this option to find out which keywords Google keyword planner thinks are relevant to your page.
For example: if Google Keyword Planner thinks your site is relevant to a specific keyword that interests you, but you’re not optimizing, you can create articles or pages that promote it. It will be easier for you because Google Keyword Planner already thinks you are suitable for positioning by this keyword.
Want to see a real example of how to use the “landing page” for SEO?
Still not sure how to use the “landing page”?
As I said a moment ago, Google Keyword Planner allows you to check quickly and relevant to your page.
This concept is essential: the keywords for which Google Keyword Planner thinks your page is relevant.
NOT those that you are trying to convince that you are relevant, but those that are already confident that you are.
I hope to give you a clue that will help you think about other ways to take advantage of this tool.
Start a new query in Google Keyword Planning and choose the first option: “Search for new ideas for keywords and ad groups.”
Enter the page of your website that you want to analyze. It can be the primary domain or an inside page.
For this example, I choose my SEO Tools page
In the Segmentation box, I say that I want to limit searches to Spain and that they are only in Spanish.
Trick Keyword Planner.
I make the query, and I go to the tab “Ideas for keywords.”
I order by the Average monthly searches, and I get a list of the keywords for which Google thinks this page of my website is relevant.
As you will see in the screenshot, I have underlined two keywords that have an attractive number of monthly searches and high CPC.
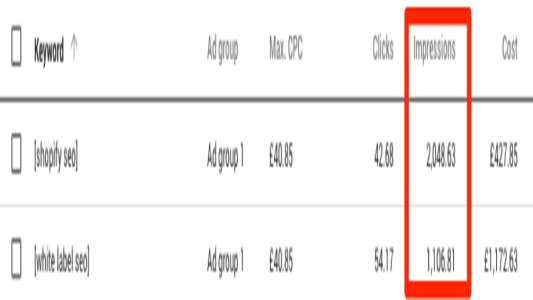
But if you analyze the landing page we have just examined, you will see that it is not optimized for any of those two key phrases, nor are they present in the text, nor the code, nothing at all.
So I would have to optimize my landing page for one of these key phrases (or both), and theoretically, I could easily position them because Google Keyword Planner already associates them in some way with this page.
Step 7: Product Category.
I don’t usually use this type of search since it’s too broad. But precisely because of this,being so widespread, it can be useful when you are looking for a niche and brainstorming.
-
- For example: imagine that you think about starting a blog about sports, and you want to see what interest’s people. You can try the category “Sport and fitness,” and you will see the most popular niches (Cricket, Basketball…) from which you can continue to deepen.
Step 8: Filters, segmentation and customization.
You can leave all these filters as they are and adjust them for later, or do it before making the query.
In principle, the most useful is to segment the search by the language you want and, depending on your target audience, also by location.
Step 9: Traffic estimates for your keyword list.
You will only use this if you advertise in AdWords, and as Marketing2Business.com, I usually try only organic positioning, I do not use this option.
Step 10: Multiply the lists to get new ideas.
This option represents a step forward in the introduction of utilities that make life easier for the suffering advertiser (or blogger)
Few ideas to support you get started: try entering your keyword phrases in the first column, and the second colors, sizes, qualifiers, locations…
-
- For example:Enter in the second column, the cities or towns where you want to verify the volume of searches.
Try qualities: expensive, cheap, free…If you already master this option and it falls short, it’s time for you to try MergeWordsWhether you choose the first or second search option, you will find a results table and two tabs.
- For example:Enter in the second column, the cities or towns where you want to verify the volume of searches.
Step 11: Tab 1; Ideas for the ad group.
In this, you will see all the Keywords grouped into semantic categories, theoretically for use in ad groups in AdWords.
If you are a follower of Marketing2Business.com, you will already know that I am more of organic positioning than of advertisements, but you can also use this information for natural positioning.
You can rely on the Ideas that appear in the “ad group” to create the categories or sections of your website, as they are logical groupings recommended by Google Keyword Planner Tool.
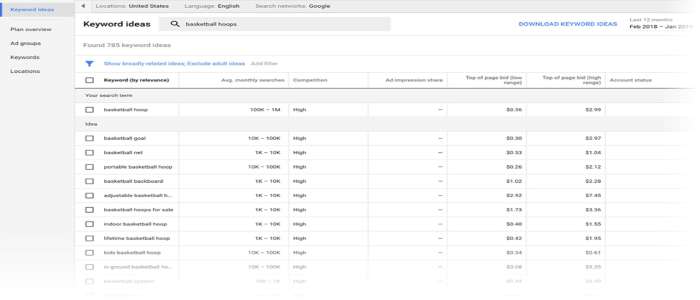
Step 12: Tab 2; Ideas for keywords.
This is the tab that you will use the most and in which you can see, from left to right:
The keyword or phrase and next to an icon in the form of a graph.
Hover your mouse over it, and you will see the evolution of search popularity in the last 12 months.
This information is always convenient to review, especially if you are working with seasonal keywords (products for Christmas, Summer Cruises, etc.)
Except for exceptions, or that you pursue seasonal keywords, you should avoid keywords whose popularity has been declining in recent months.
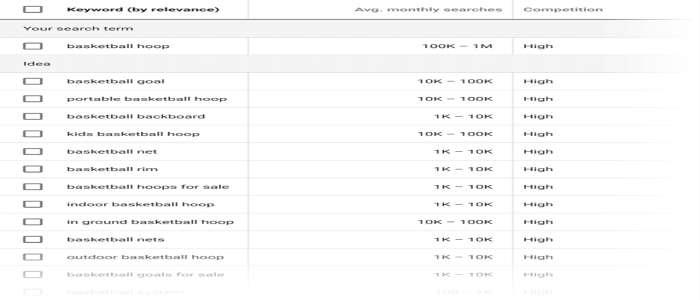
Average monthly searches:
This is the average (approximate) of searches that have been performed in the last 12 months, for the exact keyword.
In other words, for what we usually call exact concordance, equivalent to looking for the phrase as we have introduced it.
Competition:
In this column, you will see three possible options: “Medium,” “High,” or “Low.”
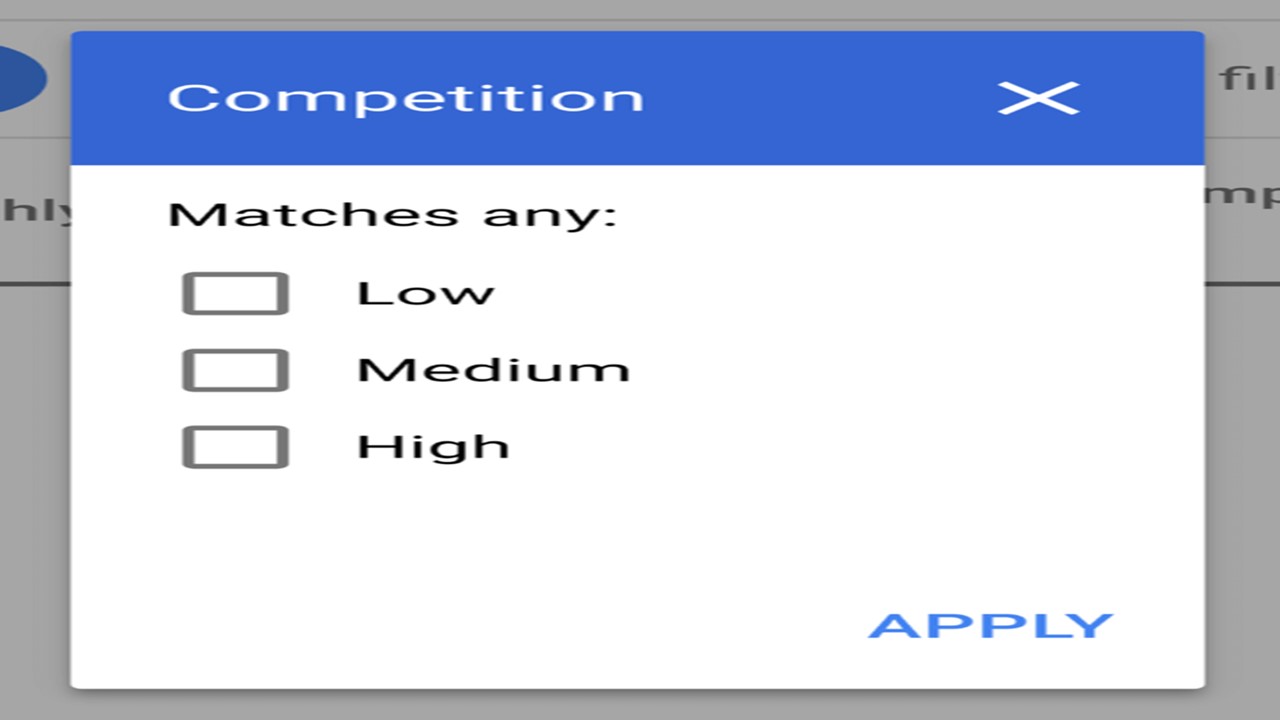
It is essential to clarify this concept because some beginners (at least it happened to me) often think that it represents the difficulty to position the keyword. And as a consequence of this misunderstanding, they tend to choose keywords with “Low” competence.
These values indicate, in broad strokes, if the keyword is very interesting for advertisers and there are many bids to get advertised with it (High competition), not so many (Medium) or too few (Low).
As a general rule (especially if you want to make money with AdWords) it is easier to monetize keywords with Medium and High competition, as they will theoretically be more profitable.
As I know this can be a bit confusing I give you an example: The keyword “plumber” has a “Low” Competition. And it is logical because the intention of the search is not clear … what does the user look for? The definition of the plumber? General information? An economic plumber? A directory?.
Instead, “locksmiths Newyork” appears with “High” Competition: and it is also logical that there are more people interested in advertising for this search, since the intention is more precise, “find a locksmith in Newyork,” and all those who offer this Service will be interested in capturing this potential customer.
Suggested Bid:
- This information is intended for the AdWords advertiser, but it is also beneficial for organic positioning.
- This figure is the average of what could be paid for each user who clicks on an ad that contains this keyword. Therefore, the higher it is, the more easily it can be monetized.
- A simple example: the CPC (cost per click) of “plumber” is priced at $ 2.98 and that of “locksmiths Newyork” at $ 17.4. If you’ve ever left your keys inside the house, you probably already know why.
Impression percentages and Add to plan:
In principle, this data does not interest you if you are not looking to advertise.
Important: keep in mind that all the data you see in Google Keyword Planner (or any other tool) is always approximations and estimates. I mean that you should use them only as a reference because, in my experience. These data are not going to correspond 100% with the reality.
Step 13: Download data.
My usual process is to download the information and work with it later, but you may prefer to filter the data before downloading it, or you may not want to download it at all.
If you want to work with the results directly in the tool or filter them before downloading them, it is time for you to experiment with the controls to the left of the list.
Remember that you can also use the filters before starting the search.
Step 14: “Segmentation” box
Here you can filter the search volume by country, language, data source (I usually don’t touch this option) and keywords that are not useful to you.
For example, you can choose to show only search data in Spain, in Spanish language and not show keywords that indicate low or no purchase interest (free, download, etc.)
Step 15: “Customize the search” box
Except for the segmentation chart (to choose language or location), I usually don’t use more filters. I prefer to download the information to work it later in Excel or another more specialized program.
But still there are times that I use them, and this is what I usually do:
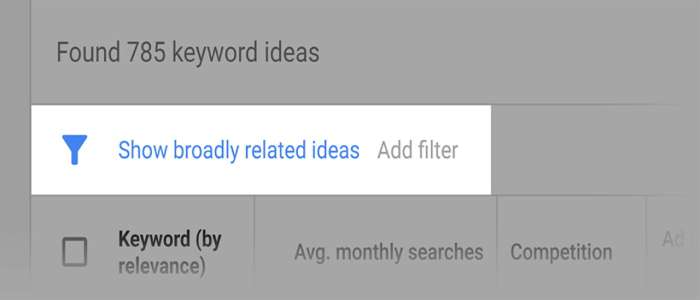
I indicate a minimum or maximum average of monthly searches, with the intention of discarding the keywords that (in principle). Would be less interesting for having few searches, or those that theoretically. Would be too complicated to position for having too many.
If I am very clear about what I want to position. Leave the control marked” Show only ideas directly related to my search terms. If I’m looking for ideas or niches, I don’t touch it because it helps to find less common keywords.
Sometimes I use the “Include / Exclude” filter when I work with a very long list. For example, when analyzing a 24-hour plumber. You could include the preposition “in” to filter only the key phrases that include a location (“plumbers in Newyork”).
If I intend to monetize the keyword, I indicate a maximum or minimum figure for the Suggested Bid.
Step 16: Download Google Keyword Planner data.
Once you have the data you were looking for, you can choose to use it directly in your article. Write down the key phrases that interest you somewhere. Or (whatever I do) download the data to work with them as I see fit.
To download them click on the “Download” button, and you can choose between three options:
-
-
- Segment statistics by month: you will have the data in columns. For each of the 12 months of the search history. It is useful to see trends in search popularity, but I do not usually use them. </li> <li> <i style = ”color: green;”> </i>.
- CSV for Adwords Editor: useful if you advertise with Adwords. I do not use it.
- CSV for Excel: what I want, and what you will surely want, so choose this option.
-
You will see the message that says your download is ready, but do not hit the close button.
The download will not start until you click on the text “The download is now available. Click here to retrieve it”.
When the file starts downloading, you can click on the “Close” button.
And in a moment you will have a file that you can open in Excel and start working. But this will be discuss in another article.